SWITNEX Waterproof Wireless Remote Control DC 8V-80V 30A Radio Control Switch User Manual
SWITNEX Waterproof Wireless Remote Control DC 8V-80V 30A Radio Control Switch User Manual
| Technical Data | |
|---|---|
| Receiver Working Voltage | DC 8V~80V |
| Quiescent Current | <5MA |
| Max Current | 30A |
| RF frequency | 433MHz |
| Working temperature | -30~+80℃ |
| Receiving Sensitivity | >97dbm |
| Storage remote controls | Up to 20 pieces |
| Support encoding | 1527 Leaning code |
| RF Operating mode | ASK superheterodyne wireless reception |
| Receiving range | Open space is more than 50 meters |
| Waterproof Grade | IP65 |
| Remote operating mode | Momentary / Toggle / Latched |
| Transmitter Battery | 2x CR2016 (included) |
Product Detail
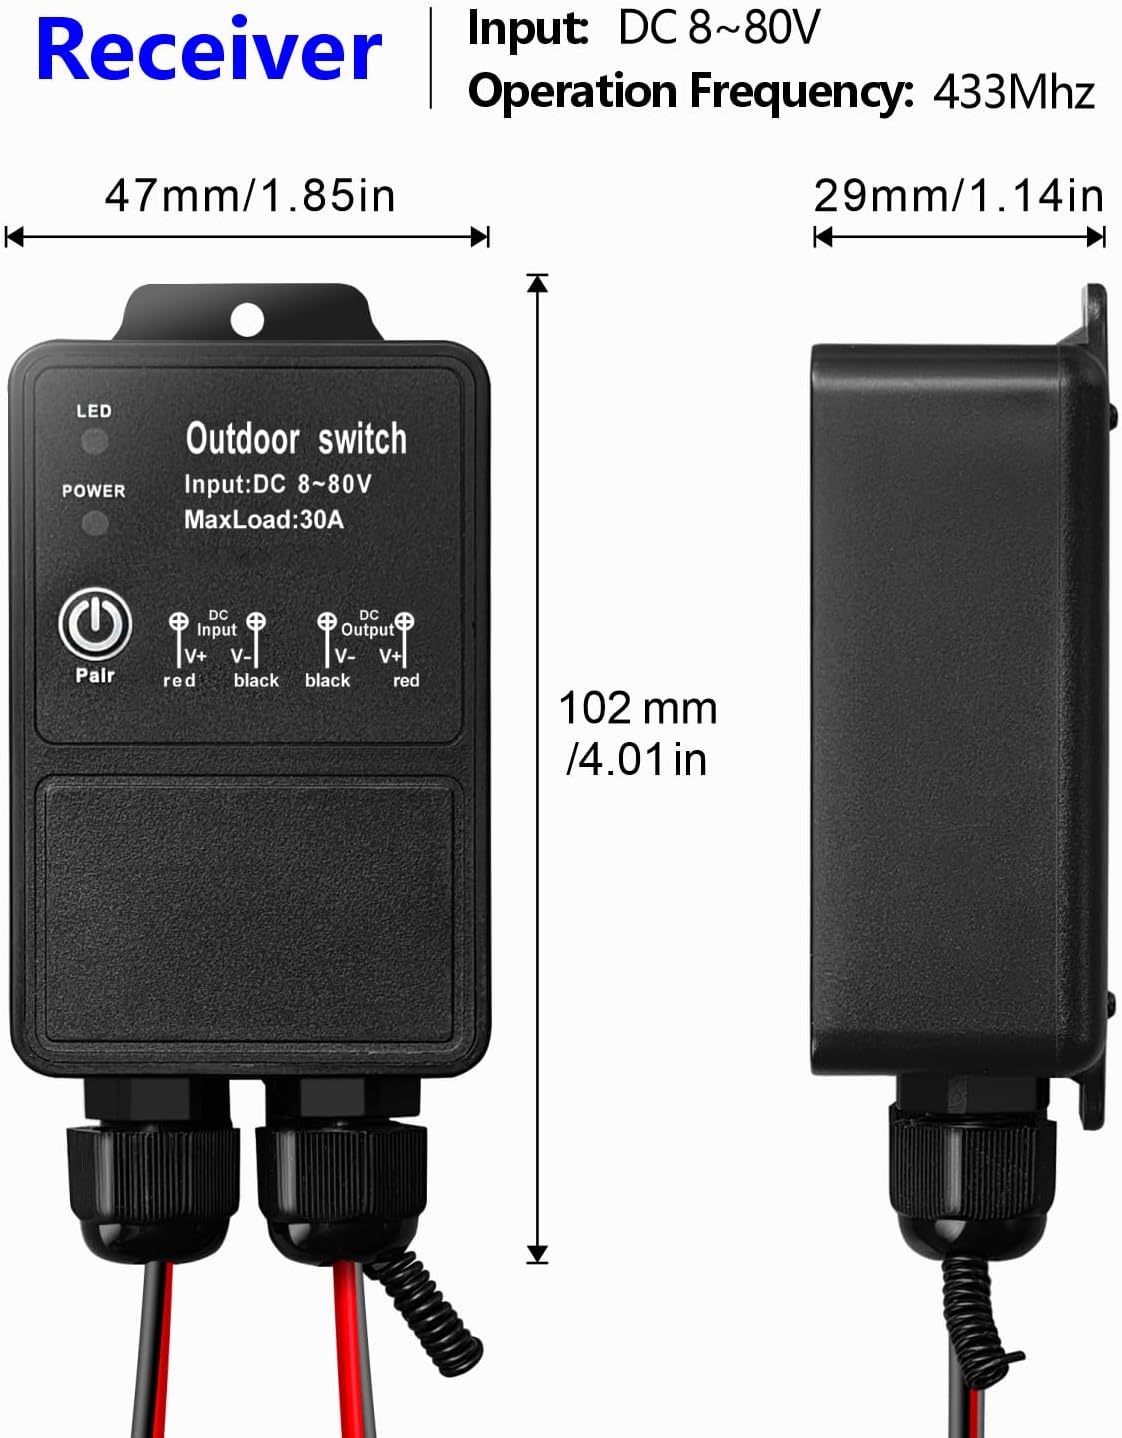
- Receiver unit – IP65 waterproof rating, suitable for outdoor/wet locations
- 2 x Transmitters – remote controls with ON/OFF buttons, 2x CR2016 batteries included
- Learning button on receiver – for programming modes and resetting
- Indicator LED on receiver – provides visual feedback
- Antenna on receiver – extend for better signal reception
- Input/Output terminals – clearly marked for DC 8V-80V connections (V- V+ input, V+ V- output)
Wiring Diagram

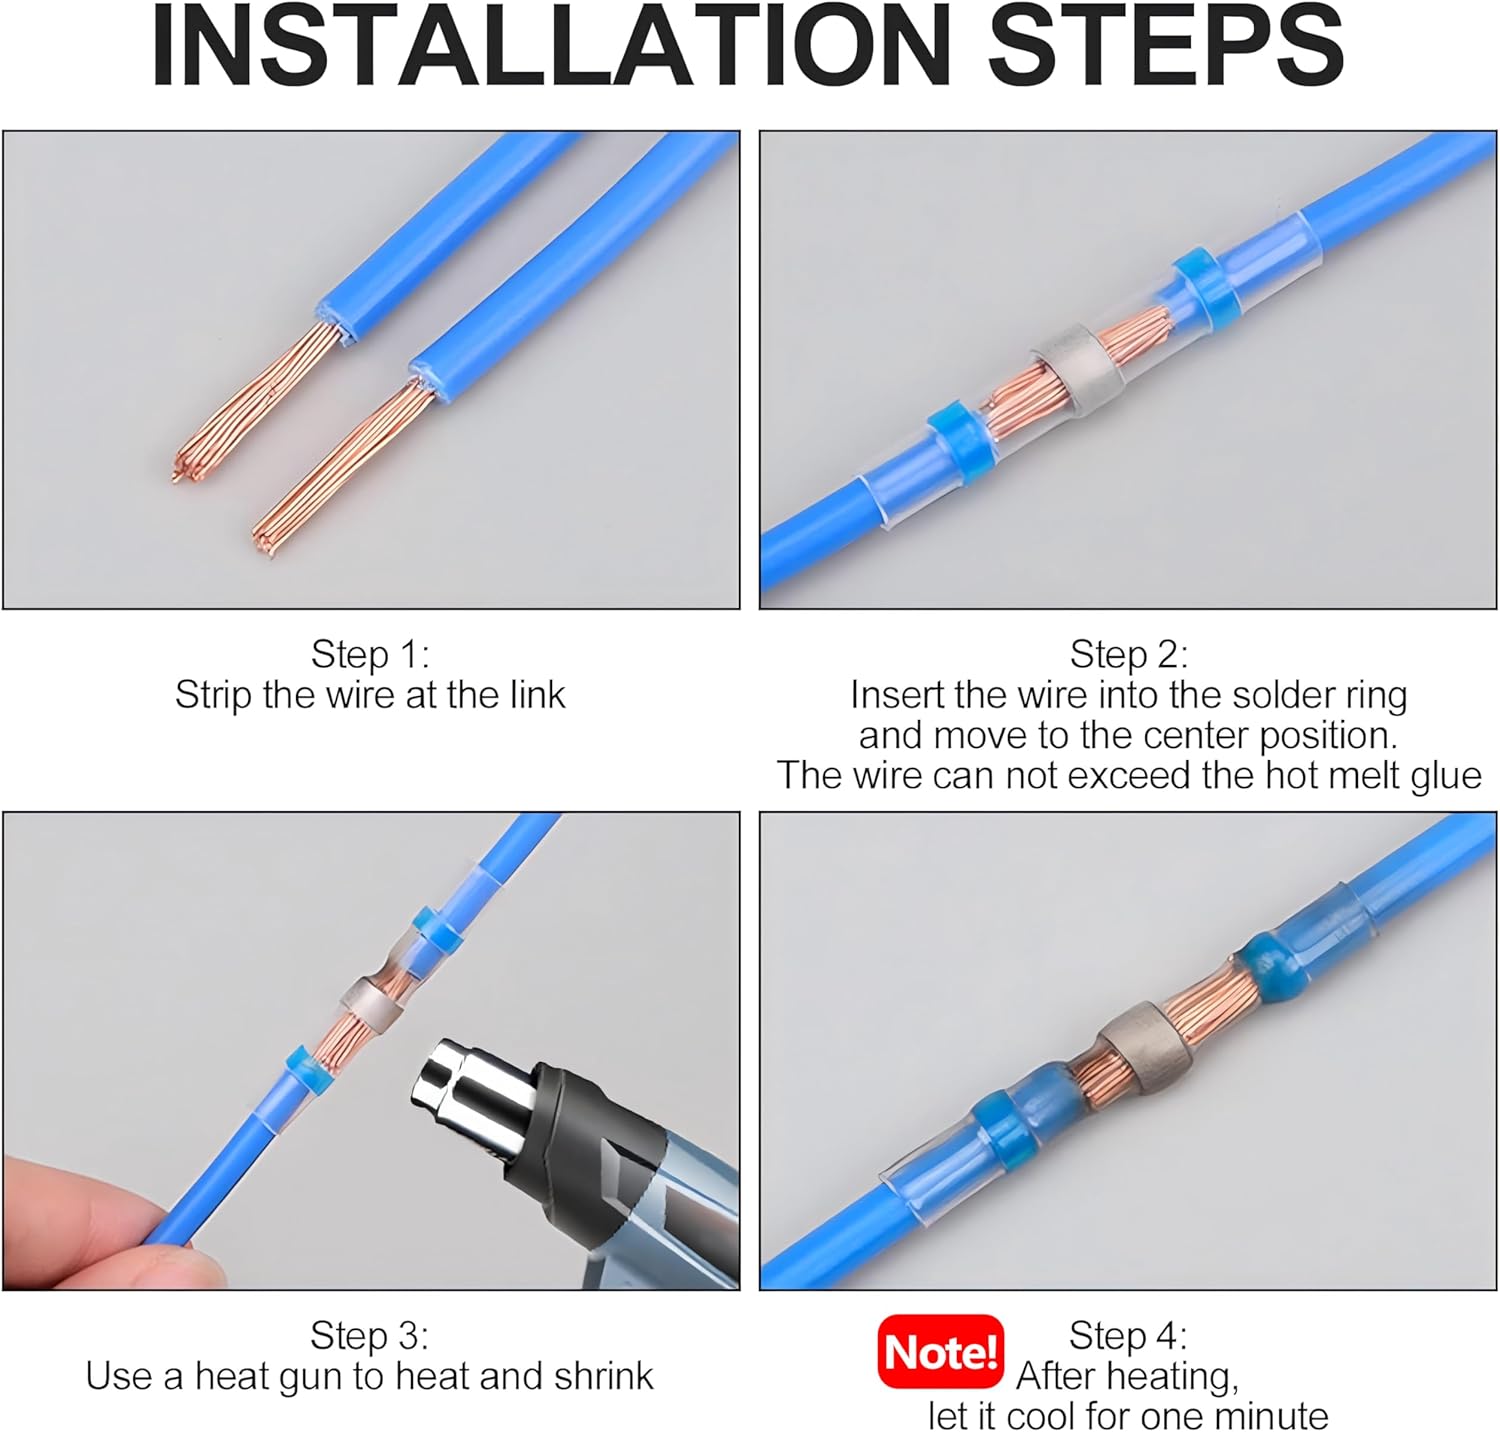
- Input: Connect DC 8V-80V power supply to V- (negative) and V+ (positive) input terminals
- Output: Connect device to V+ and V- output terminals
- Use heat shrink solder connectors for secure waterproof connections (strip 5-7mm, insert, heat with heat gun, cool 1 minute)
Warning
- Always disconnect power before performing any wiring or maintenance.
- Ensure all wiring connections are secure and properly insulated.
- Do not exceed the maximum current rating of 30A.
- The product is IP65 waterproof, but avoid prolonged submersion in water.
- Keep remote controls away from children.
- Usually the receiver and transmitter have been paired in factory. If not, reprogram them.
- Reset before you want to change the operating mode.
- After reset, all remote controls cannot work anymore.
- Replace the battery in time when the remote transmitter voltage is low.
- Slightly stretch the antenna on the receiver for better signal reception.
Operating Mode
The product is pre-set to Latched mode by default. Follow the steps below to change modes.
Momentary Mode
Press and hold a button → relay turns ON
Release the button → relay turns OFF
How to program:
- Press the learning button on the receiver 1 time. Wait 3 seconds.
- Press the ON button on the transmitter. Wait 3 seconds.
- Press the OFF button on the transmitter. Setup complete.
Toggle Mode
Press a button once → relay turns ON
Press the same button again → relay turns OFF
How to program:
- Press the learning button on the receiver 2 times. Wait 3 seconds.
- Press the ON button on the transmitter. Wait 3 seconds.
- Press the OFF button on the transmitter. Setup complete.
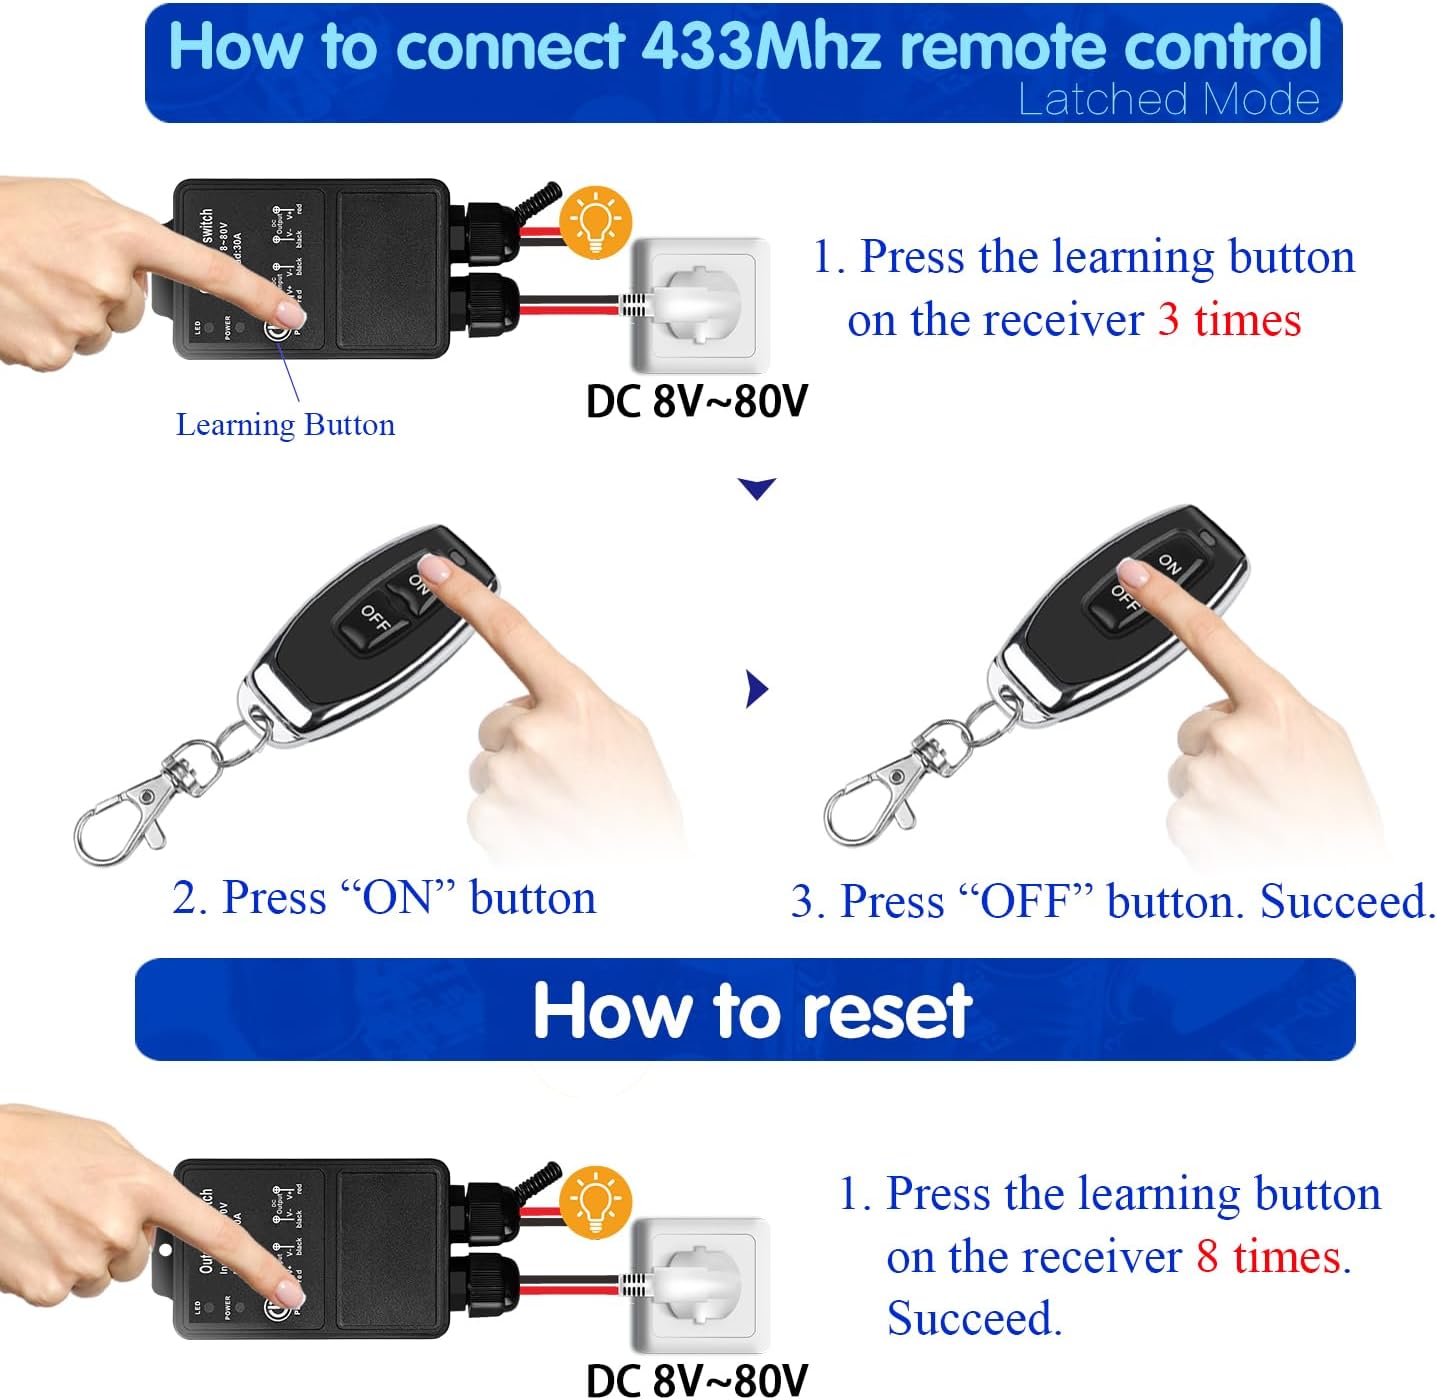
Latched Mode (Default)
Press ON button → relay turns ON
Press OFF button → relay turns OFF
How to program:
- Press the learning button on the receiver 3 times. Wait 3 seconds.
- Press the ON button on the transmitter. Wait 3 seconds.
- Press the OFF button on the transmitter. Setup complete.
Reset
To clear all paired remote controls from the receiver’s memory, press the learning button 8 times consecutively. The reset is successful. After reset, previously paired remote controls will no longer function.
Troubleshooting
If the receiver and transmitter cannot operate normally, try the following steps:
- No response from receiver: Check power supply (DC 8V-80V). Ensure transmitter batteries are not depleted. Verify pairing (re-pair if needed). Check for obstructions or excessive distance.
- Intermittent operation: Weak transmitter battery (replace). Interference from other RF devices. Extend receiver antenna.
- Incorrect operating mode: Reprogram the desired mode (see Operating Mode).
Maintenance
- Cleaning: Wipe with a soft, dry cloth. Do not use liquid cleaners.
- Battery replacement: Replace transmitter batteries (2x CR2016) when range decreases or LED dims. Ensure correct polarity.
- Waterproofing: Check seals periodically. Keep connector points dry and secure.
- Storage: Store in a cool, dry place when not in use.
Contact
- WhatsApp: +86 15812381273
- Email: linktrol@icloud.com
If there is any question about the products, please contact us first. We will do our best to solve your problem. Thank you.


For an exclusive 10% OFF upgrade discount, Use code: FBA10.
Copy the code before visiting the shop.